Get your patient on Mtl1 Leucoflex - Anticoagulant Citrate Phosphate Dextrose Solution With As-1 (Anticoagulant Citrate Phosphate Dextrose Solution With As-1)
Mtl1 Leucoflex - Anticoagulant Citrate Phosphate Dextrose Solution With As-1 prescribing information
Description
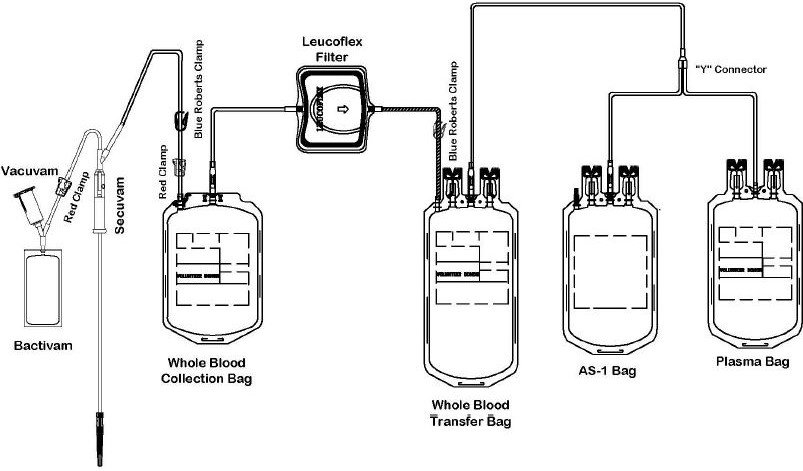
The Leucoflex MTL1 product consists of a blood collection system with 70mL of CPD for the collecion of 500 +/- 50mL of blood and 110mL of AS-1 Additive Solution. They are supplied with sterile, non-pyrogenic fluid pathways. The product as supplied includes an in-line leukoreduction filter known as Leucoflex MTL1, storage containers for blood components and tubing, a sample diversion pouch (Bactivam), a vacuum tube adapter (Vacuvam), and a protective shield for the used needle (Secuvam).
Representative Product Drawing
COLLECTION AND SAMPLING PROCEDURE
Before Donation
1) Peel open the transparent overwrap (D) using the corner flap.
2) Support blood bag system as far as possible below donor arm, ideally on an automated blood mixer.
Note: it is recommended that the primary bag on the mixer lies with the tubing on the lower side of the mixer holding plate.
3) Apply tourniquet or pressure cuff (inflate to approximately 60 mm Hg).
4) Prepare venipuncture site as per your SOP.
5) Ensure that the donor line is not twisted or tangled.
Venipucture
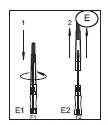
1) Open the needle cap (E1) using the following procedure:
a) Twist the needle cap, thus breaking the seal.
b) Lift the cap off of the needle (E2) in a straight line taking special care not to touch the needle in the process (F). Keep hands behind the needle at all times during set use and disposal.
2) Perform the venipuncture
3) After the needle has been inserted, introduce the Secuvam onto the hub of the needle.
4) Tape the Secuvam onto the donor's arm.
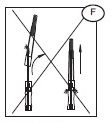
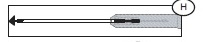
Note: if the Secuvam causes discomfort to the donor or decreases the blood flow because of the angle of the needle, leave the Secuvam on the tubing, behind the needle hub (G) during collection. Secure the needle into the Secuvam at the end of the donation (H).
After Venipuncture
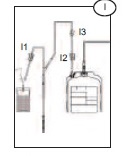
1) Ensure that the clamp between the Bactivam pouch and the donation line is open.
2) Ensure that the Bactivam pouch is held below the level of the venipuncture site, and is supported at all times.
3) Allow blood to run into the Bacivam pouch until the pouch fills (approximately 30ml) (I).
4) Close the red clamp (I1) on the transfer line to the Bactivam pouch, by holding the clamp in one hand and squeezing the two edges together, until it locks (a click my be heard).
Note: the red clamp cannot be opened after it has snapped shut.
5) Break the break-away cannula (I2) on the donor line by holding the cannula in one hand and the plastic Y-junction in the other and snapping the cannula both left and right to ensure a clean break. Allow the donation procedure to continue, ensuring that the blood bag is mixed immediately when blood flows into the primary bag.
Note: This step may be done prior to venipuncture if the Blue Roberts clamp (I3) on the donor line is closed prior to breaking the break-away cannula.
6) If using an automated mixer, open the mixer clamp and start the mixer at this point.
Note: it is recommended that the primary bag on the mixer lies with the tubing on the lower side of the mixer holding plate.
7) After approximately 50 ml of blood enters the primary bag, mix thoroughly (when possible).
Note: Collect the quantity of blood stated on the blood bag label.
Sampling Procedure
Note: this is done during the donation. Avoid air in the collection of sample tubes from the diversion pouch to ensure adequate sample volume and avoid hemolysis.
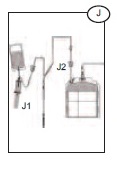
1) Hold the Bactivam pouch with the Vacuvam below it (J), to ensure good blood flow from the pouch to the sampling device, and no introduction of air into the sampling tubes.
2) Remove the cap of the Vacuvam sampling device, and retain for later use (when possible).
3) Introduce a vacuum sampling tube by holding the barrel of the Vacuvam and directing the sample tube cap directly onto the needle inside the device (J1).
4) Blood is drawn automatically into the sampling tube, stopping at the appropriate volume.
5) When the sample tube stops filling, withdraw the tube, ensuring that the tube is pulled out of the barrel in a straight line.
6) Repeat the sampling procedure steps (3 to 5) with all remaining sampling tubes.
7) When all samples have been taken, replace the Vacuvam cap to prevent accidental access to the interior needle (when possible).
8) Mix the blood in the primary bag regularly (approximately every 100 ml or every minute).
After Donation
1) Once the required volume of blood has been collected, close the red clamp on the donor line (J2), at least 12 inches above the primary bag.
Note: if necessary, place a Hemostat on the collection line just below the Secuvam.
2) Release the pressure cuff or tourniquet, and immediately mix the whole blood in the primary bag.
Note: if the needle was taped to the arm, and not the Secuvam, remove the tape from the needle before pulling the needle into the Secuvam (disregard step 3).
3) Remove the tape holding the Secuvam in place.
4) Remove the needle by gently pulling the needle into the barrel of the Secuvam while supporting the Secuvam with one hand (a click may be heard).
Note: if necessary, step 4 may be done before step 3.
5) Remove and discard the cap (if relevant) from the barrel of the Vacuvam, into an appropriate container.
6) Insert the Secuvam needle protector into the barrel of the Vacuvam sampling device.
7) After removing the blood from the mixer/trip scale, mix the blood unit thoroughly.
8) If the donor line is to be used for quality control, strip the line as per procedure (at least 3 times), heat-seal (place clips) and cut (between the clips), leaving sufficient line for testing purposes.
Note: if it is necessary to strip the donor line, it is recommended to strip within 4 minutes of the end of the donation, in order to avoid introducing clots into the blood bag.
9) Ideally, heat-seal the donor line as close as possible to the pack (~1 inch). Alternatively, place clips close to the blood pack and cut between the clips. Mix thoroughly during and immediately after the procedure.
Note: this is an in-line filter system; there is no need to keep the donor line for cross-matching segments.
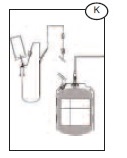
10) Remove and discard the donor line (K) with the two red clamps, Bactivam, Vacuvam and Secuvam as per SOP.
Note: the completely protected needle after securing the Secuvam inside the rigid Vacuvam sleeve can be disposed of in general biowaste vs. a sharps container